Substrate & EVM accounts
Creditcoin is both a Substrate-based and a fully EVM compatible blockchain. To achieve this it uses a dual-account system to keep the native Substrate interactions untouched while providing the Ethereum-like experience many web3 users are familiar with.
Each type of account is meant to interact with different parts of Creditcoin. Substrate accounts are required to participate in the Nominated Proof-of-Stake consensus system, bond CTC and earn rewards by either contributing to block production or nominating validators. Meanwhile, only EVM accounts can interact with smart contracts and user defined tokens.
Accounts
Section titled “Accounts ”Accounts represent entities that interact with the Creditcoin blockchain. They can be owned by a single user or shared by teams and organizations, and anyone can own multiple accounts. Accounts have several components:
- Mnemonic seed phrase: these are human-readable phrases that must be kept secret and can be used to generate one or several private keys. The process of generating a private key from a seed phrase is called Derivation. For basic users, having one seed phrase per private key is recommended to make backup and safekeeping of the account easier.
- Address: the public part of the account; anyone with an address can send funds to it or check its status (balance, staked funds, validator activity and more). Substrate and EVM accounts have different address formats.
- Associated accounts: these are keyless accounts that cannot be directly controlled, but play a key role in allowing interactions between Creditcoin and its integrated EVM. Associated accounts can receive and store funds on the main account’s behalf. Depending on the type of the main account (Substrate or EVM), associated accounts behave differently.
Substrate Accounts
Section titled “Substrate Accounts ”On the Substrate side, accounts generate SS58 addresses. This is a simple address format designed for Substrate based chains. All Creditcoin SS58 addresses are prefixed with 5 and are 48 characters long. These accounts can be managed by Substrate wallets such as Subwallet, Polkadot-JS Extension, Subkey and the Creditcoin CLI.
Associated account behavior
Section titled “Associated account behavior ”All user controlled substrate accounts have an associated EVM account with the only purpose of receiving CTC from other EVM accounts and storing it. The Substrate account will not be able to use the funds stored by the associated account until it executes a Withdraw extrinsic.
| Substrate Account Example | |
|---|---|
| Mnemonic seed phrase | cave illegal cost badge memory weird beauty hire insect soda surface deal |
| Private key | 0xaa7e880dff1594181301631b6fdb8c0078a6e2f5b8e95596bf87c05a524f364c |
| Address | 5G1qRyfXBeroVHGQx37gh6xGbMWXWFPESAFmUhLKxmU6J9nW |
| Associated EVM account | 0xAeC0b1E7DccaC53a866aB55253aCb156b787878F |
EVM Accounts
Section titled “EVM Accounts ”EVM accounts are different, they use H160 addresses, which are commonly used by all Ethereum-like blockchains. These start with 0x and are 42 characters long. EVM accounts can only be managed by EVM compatible wallets such as Subwallet, Metamask and, with limited functionality, Creditcoin CLI.
Associated account behavior
Section titled “Associated account behavior ”All EVM accounts have an associated Substrate account. These work differently than their Substrate counterparts: all funds sent to the associated account will be available for use inside the EVM instantly; there is no need to withdraw.
| EVM Account Example | |
|---|---|
| Mnemonic seed phrase | mesh brother dry nothing flame switch cost emotion tone unveil route moment |
| Private key | 0xc7a32f037d34114c1028aa8661ef7302d3b2acd83fcbc3654da08a50b1271497 |
| Address | 0x350532caba9478983e37f2f83744293bb1a3c9d1 |
| Associated Substrate account | 5CJx1pHZEuTBMiRw2n5t3N2gAYrt3aKh976K3upN4qtcAQmh |
Transferring from Substrate to EVM
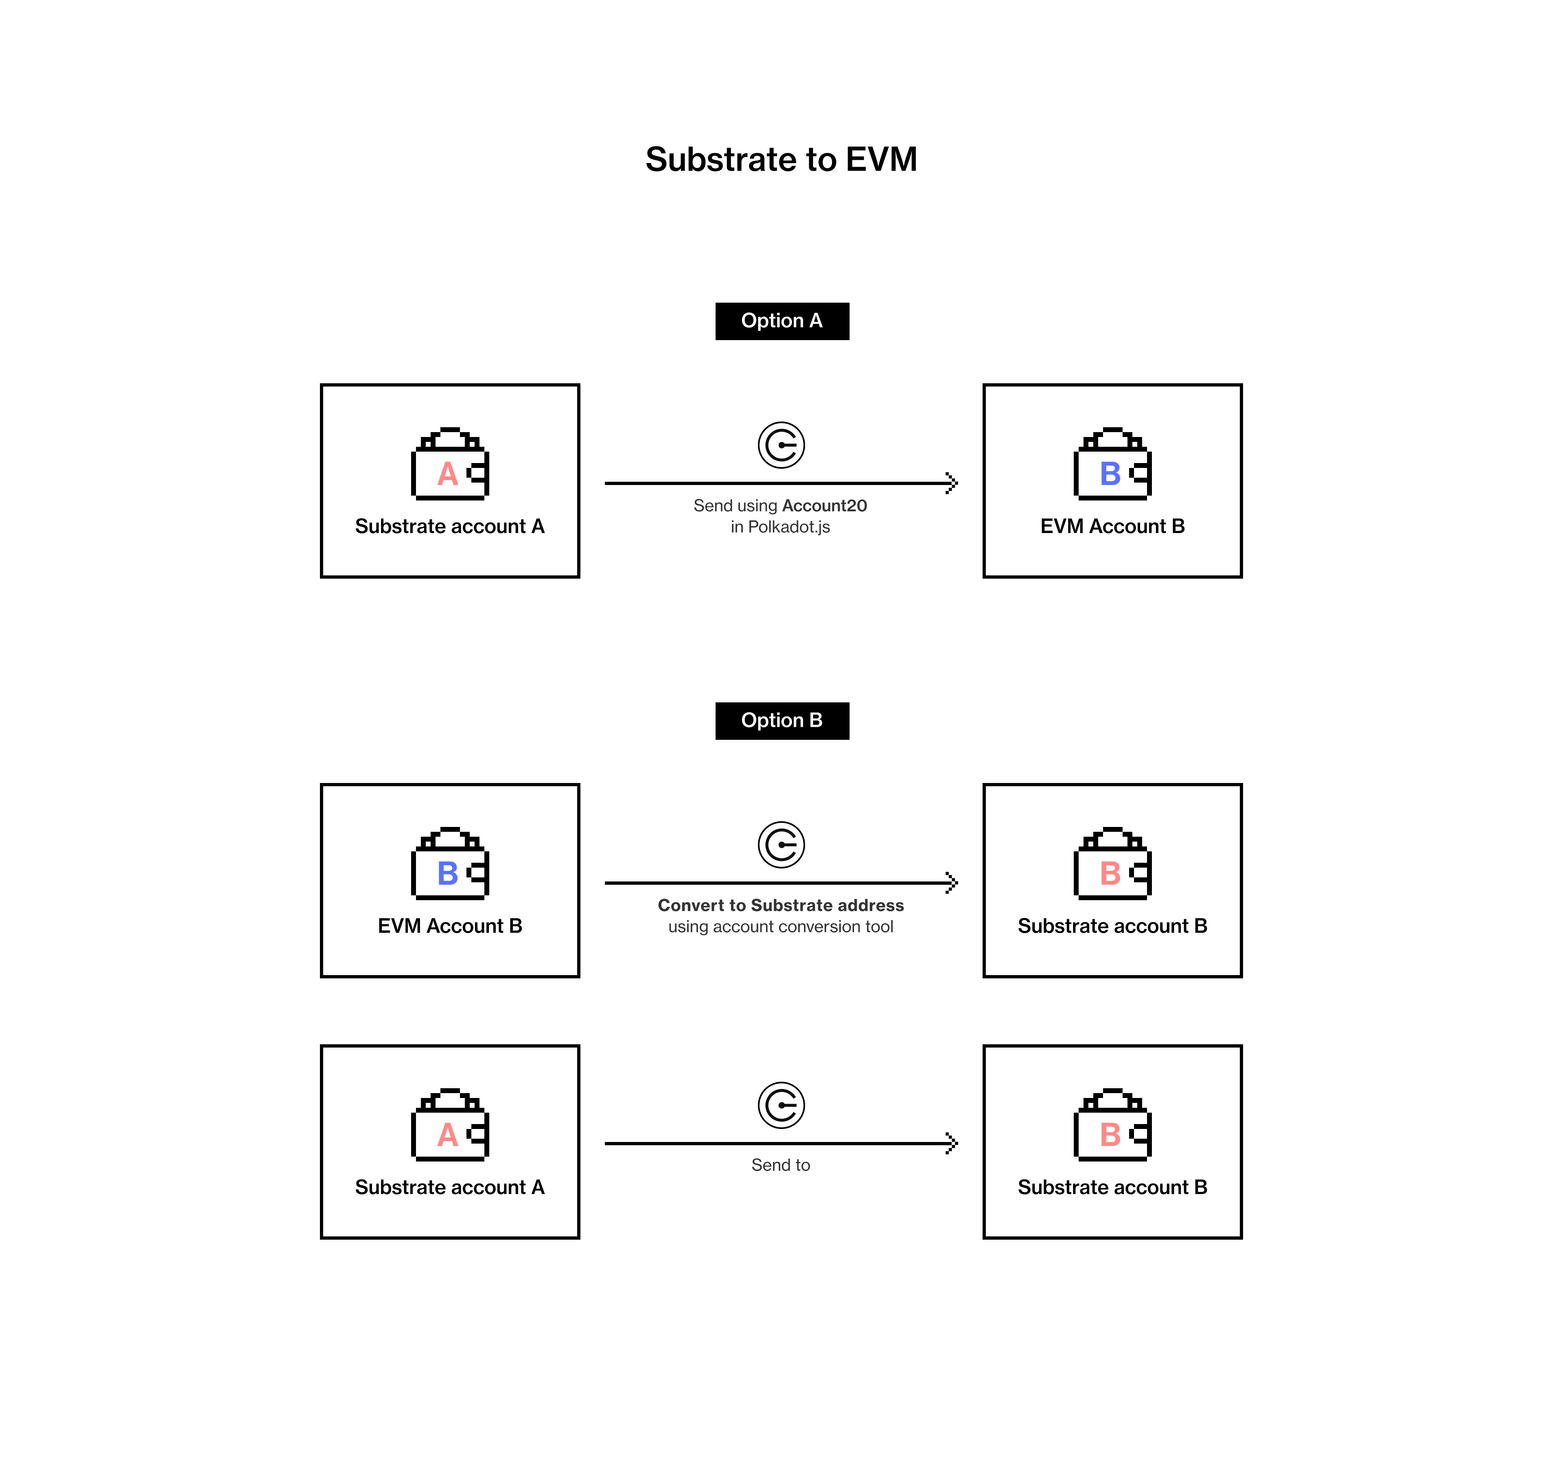
Section titled “Transferring from Substrate to EVM ”Funding an EVM account means funding its associated Substrate account.
- Get the Substrate address associated with the EVM main account using
creditcoinCLI. - Send CTC from a Substrate account to the Substrate address generated from the EVM account (Substrate → Substrate transfer).
- Funds should automatically be reflected on EVM wallets such as Metamask.
As an alternative, you can use Polkadot-JS UI to call balances.transferKeepAlive (recommended) or balances.transferAllowDeath directly to the EVM address by selecting Account20 (enter the address in lowercase as Polkadot.js UI does not allow uppercase characters in EVM address input fields).
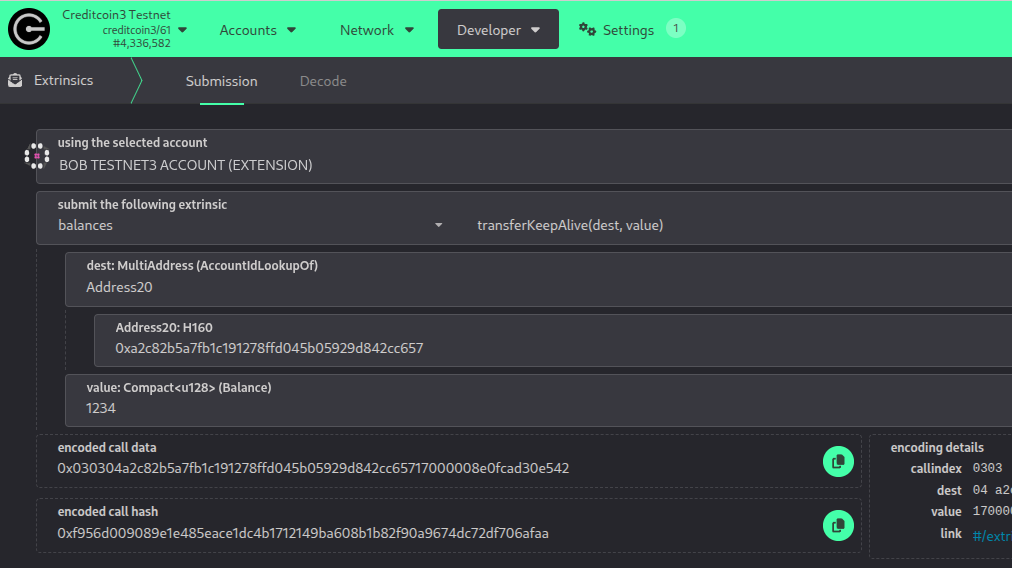
Funding an EVM account using Polkadot-JS UI
Transferring from EVM to Substrate - Using Polkadot-JS UI
Section titled “Transferring from EVM to Substrate - Using Polkadot-JS UI ”- Get the EVM address for the owned Substrate account using
creditcoinCLI or Subscan address conversion tool. - Use any EVM wallet to send funds from the EVM account to the EVM address associated to the Substrate account we want to send CTC to (EVM → EVM transfer).
- The funds will be available in the associated EVM account, but not usable by the Substrate side. To make them available once again we must unlock them by calling the
evm.withdrawextrinsic with the correct associated EVM address and the amount that we want to withdraw.creditcoinCLI and Polkadot-JS UI can be used to perform the withdraw.- Using
creditcoinCLI you can type the following command :creditcoin evm withdraw - Using Polkadot-JS UI to call
evm.withdraw
- Using
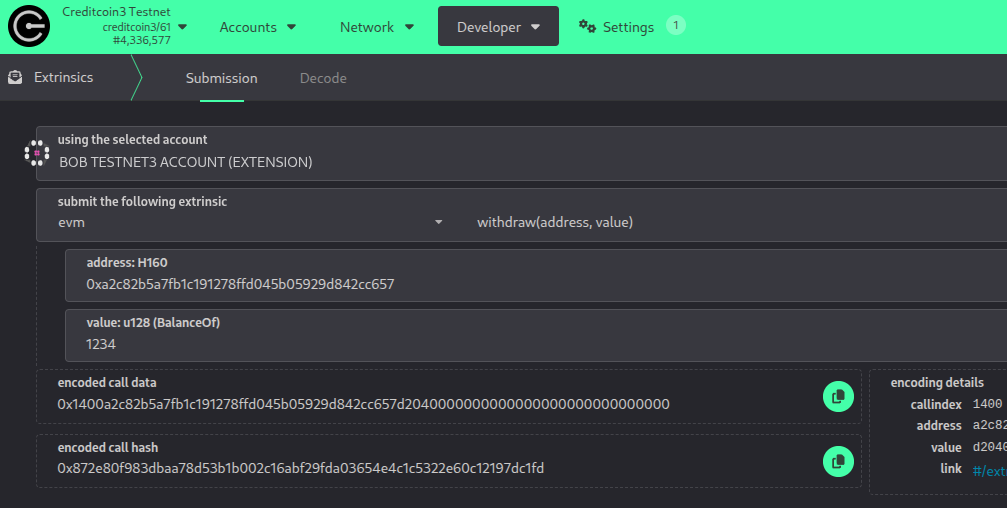
- After calling
withdrawfunds should be available once again on the Substrate
Transferring from EVM to Substrate - Using a Precompile (Smart Contract)
Section titled “Transferring from EVM to Substrate - Using a Precompile (Smart Contract)”The following commands require Node.js to be installed.
-
Create ‘package.json’ file with default values:
npm init -y -
Open the folder with any text editor(e.g., VM/Nano) or any IDE and add the following line to package.json
"type": "module" -
Install dependencies
npm i ethers@5.7.2 -
Create a new file named ‘index.js’ and paste the following content
import * as ethers from 'ethers'
async function go() {  // Initialize variables  const pk = "private key goes here, including the starting 0x";  const abi = [    {      "anonymous": false,      "inputs": [        {          "indexed": true,          "internalType": "address",          "name": "from",          "type": "address"        },        {          "indexed": true,          "internalType": "bytes32",          "name": "destination",          "type": "bytes32"        },        {          "indexed": false,          "internalType": "uint256",          "name": "amount",          "type": "uint256"        }      ],      "name": "Transfer",      "type": "event"    },    {      "inputs": [        {          "internalType": "bytes32",          "name": "destination",          "type": "bytes32"        },        {          "internalType": "uint256",          "name": "amount",          "type": "uint256"        }      ],      "name": "transfer_substrate",      "outputs": [],      "stateMutability": "nonpayable",      "type": "function"    }  ];  const provider = new ethers.providers.JsonRpcProvider("https://rpc.cc3-testnet.creditcoin.network");
  // Create a wallet instance  const wallet = new ethers.Wallet(pk, provider);
  // Set the contract address  const contractAddress = "0x0000000000000000000000000000000000000fd1";  const contract = new ethers.Contract(contractAddress, abi, wallet);
  // Define the function to call  const functionName = "transfer_substrate";
  // Convert the public key of the destination address from hex string to bytes  const hexToBytes = ethers.utils.arrayify("public key goes here, starting with 0x");
  // Transfer amount in wei  const transferAmount = ethers.utils.parseEther('10');
  // Create the transaction data  const txnInput = contract.interface.encodeFunctionData(functionName, [hexToBytes, transferAmount]);
  // Define gas fees  const gasPrice = ethers.utils.parseUnits('6', 'gwei');  const maxPriorityFeePerGas = ethers.utils.parseUnits('2', 'gwei');  const gasLimit = 80000;
  // Create the transaction object  const txObject = {    to: contractAddress,    data: txnInput,    gasLimit: gasLimit,    maxPriorityFeePerGas: maxPriorityFeePerGas,    maxFeePerGas: gasPrice  };
  // Sign and send the transaction  const response = await wallet.sendTransaction(txObject);  console.log("Transaction Response:", response);
  // Wait for the transaction to be mined  const receipt = await response.wait();  console.log("Transaction Receipt:", receipt);}
go().catch(console.error);
4.1 Enter the EVM private key of the wallet from which you want the funds to be sent from at line 5
- Obtain the hex format of the Substrate public address destination:
5.1 Go to https://creditcoin3-testnet.subscan.io/tools/format_transform
5.2 Paste your substrate address in the “Input Account” field
5.3 Set Output Type to Public Key
5.4 Enter the Public Key in line 20 in ‘index.js’ file - Run the Script
node index.js
After running the scripts, to check the transaction details
Section titled “After running the scripts, to check the transaction details”-
Go to Blockscout
- For Testnet, use: https://creditcoin-testnet.blockscout.com
- For Mainnet, use: https://creditcoin.blockscout.com
-
Copy the TransactionHash from the output and paste it in the Blockscout
-
Click “View details” on the Transaction details page to check the destination and amount
or
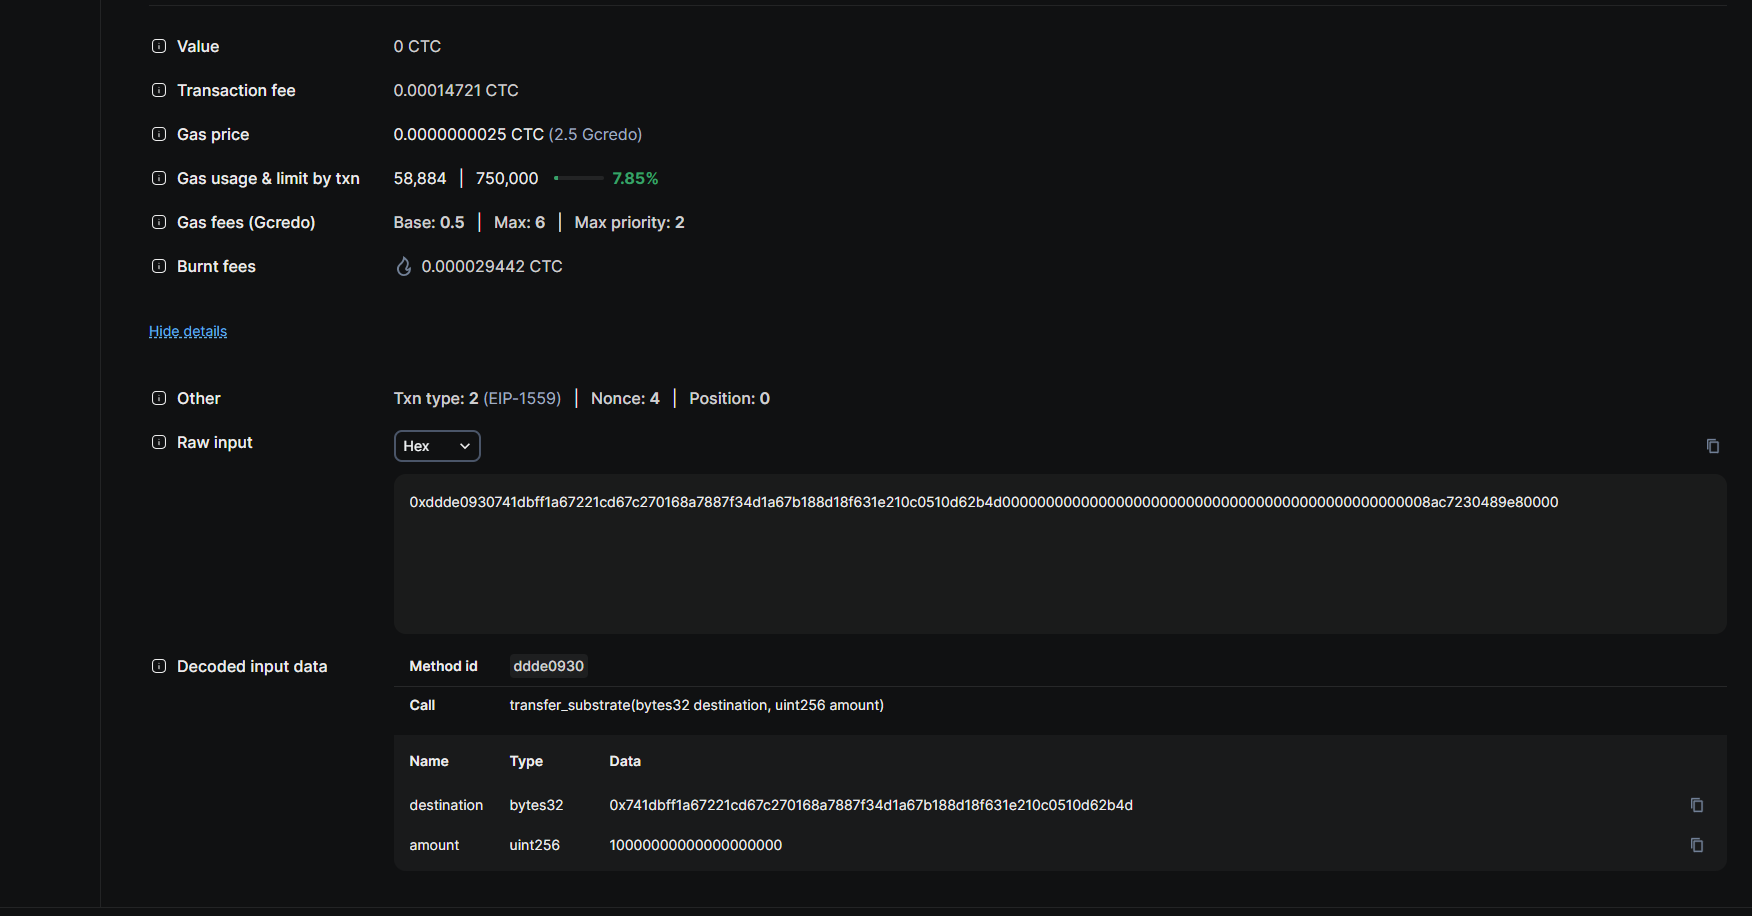
-
Go to Logs tab
-
Convert the Hex value to Address in the dropdown to verify the source and destination addresses
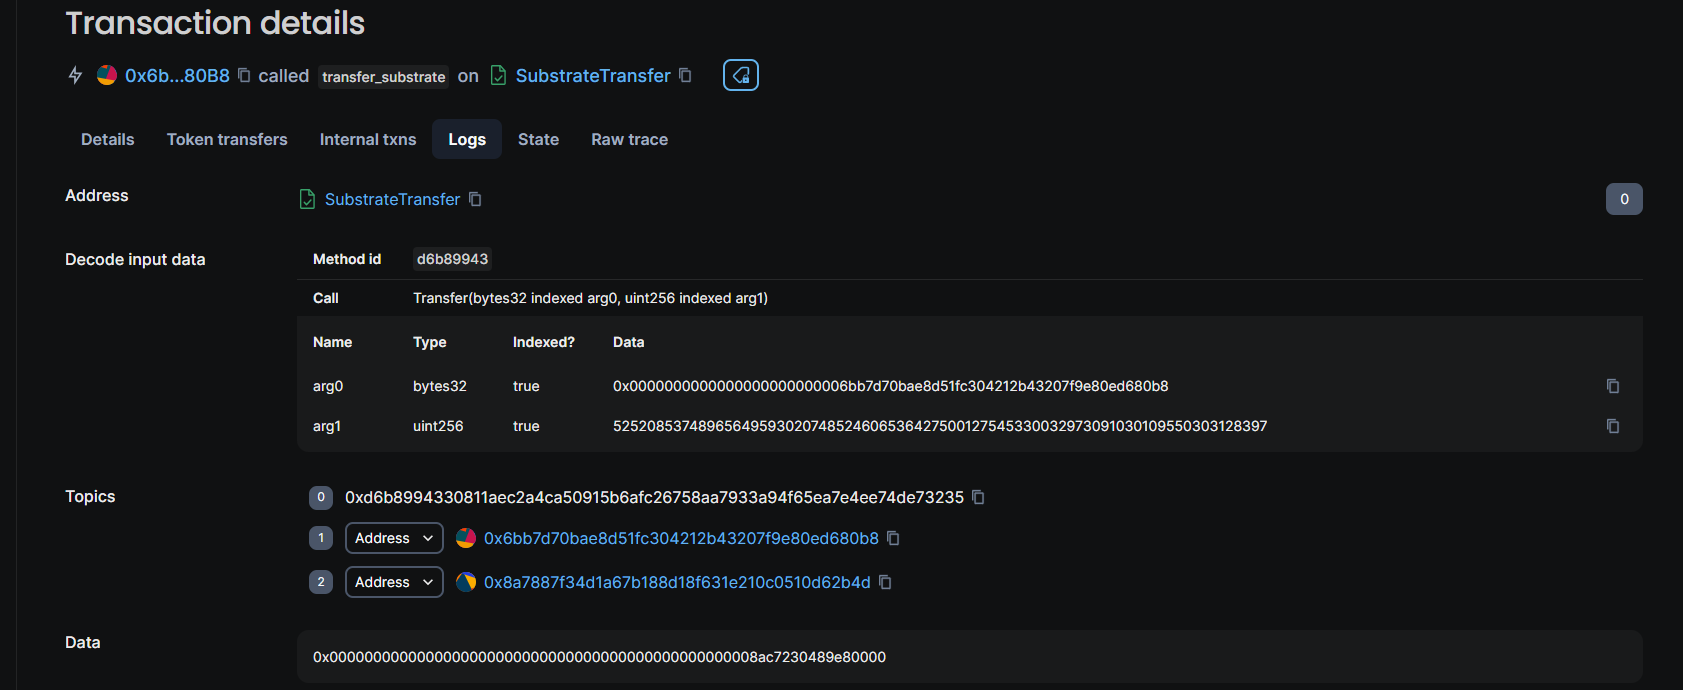
To check the updated balance, you need to verify the substrate address on Subscan or polkadot
Section titled “To check the updated balance, you need to verify the substrate address on Subscan or polkadot”Transferring from EVM to Substrate - Using Credit Wallet
Section titled “Transferring from EVM to Substrate - Using Credit Wallet”Please refer to the Credit Wallet Guide Page: https://docs.creditcoin.org/wallet/credit-wallet-guide
Section 4: Token Transactions - Token Transfer Between Creditcoin Native (Substrate) and Creditcoin (EVM)